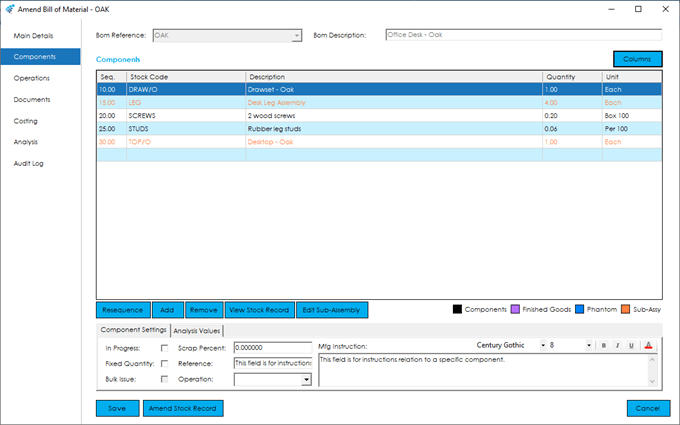
Components Tab
The components list contains all the products required to manufacture this bill of material. Typically, a components list is created with items added in the order they will be consumed during the build, although this is not a requirement in the system.
A definition of the columns displayed in the components grid can be found below:
Seq. (Sequence): This column displays the sequence number for the component. When adding a component to this grid, the sequence number will default based on the interval setting defined in the BOM Settings.
Stock Code: This column displays the stock code for the component.
Description: This column displays the stock description for the component. It is inherited from the Stock Record for that component and cannot be amended in the Bill of Materials module.
Quantity: The quantity of components required to manufacturer the finished item.
Note: Remember to configure the component quantity based on a build quantity of 1. For example, if you were creating a bill of material for a chair, you would typically add a component for the chair legs and would need 4 of them to make 1 chair.
Unit: The relevant unit of measure that the quantity relates to. You can select from any unit of measure defined against the component stock record.
Note: You can use the unit of measure field to simplify the quantities required of this item. A useful example of this may be a bill of material that required 3 screws.
If you stocked those screws in “Boxes of 100” and defined a unit of measure of “Each” against that item, with a conversion ratio of 0.01, you could enter the component line with either 3 x “Each”, or 0.03 x “Box 100”. This would result in the same quantity being required but makes it easier for picking the stock for manufacture.
Components listed in the grid will be displayed in the colour codes defined in the BOM Settings based on the item type. A legend for these colours is displayed beneath the components grid.
Columns: Using the Columns button in the top right corner of the component grid, you can choose whether to include additional columns for quicker/easier data entry.
The columns available for selection include the “Component Settings” fields, such as ‘In Progress’, ‘Scrap Percent’ and ‘Operation’, along with any Component Analysis Codes that have been setup in the system.

In the screenshot above we have added the ‘Operation’ and ‘PCB Location’ fields to the grid.
Once the columns are added to the grid, you will be presented with the appropriate controls for the field data type when interacting with that field. For example, the ‘Operation’ column would present you with a drop down selector.
Adding Components Items
You can add component items to the components grid in one of two ways.
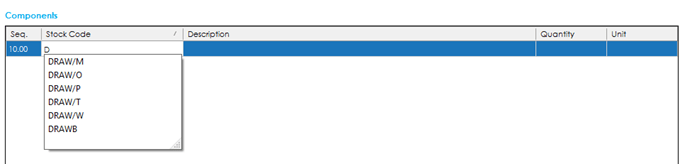
The first is via the components grid. Select the stock code cell on the 1st available empty line and type the stock code you wish to add. As you begin to type, a smart search will appear, allowing you to either continue typing, or select the appropriate record using the mouse.
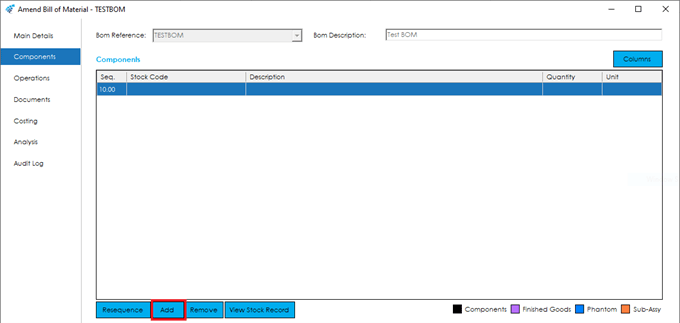
Alternatively, you can use the Add button located underneath the components grid.
You will then have access to a search screen, allowing you to search for a product to add. This is useful if you are unsure of the stock code.
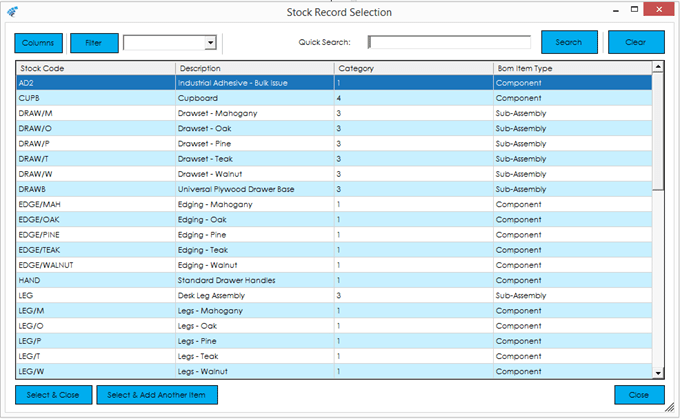
You have access to any of your own private or public filters setup within the Stock module in this screen, as well as being able to define the columns you want to display, and can subsequently search using the ‘Quick Search’ functionality.
You can either select an individual item by highlighting it in the list and pressing Select & Close, or, you can select an item and continue selecting further items using the Select & Add Another Item button, or, simply double clicking in the list.
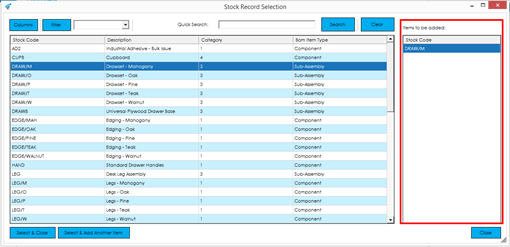
Doing so will add a list view of the items you have selected.
When you have finished selecting items, press Select & Close on the last item, or press the Close button. Using the Close button will ask you to confirm if you wish to add the items in the list to the BOM, or if you wish to cancel.
Additional Component Settings
Once you have added an item to the grid, you can configure any additional component settings relevant to the component item. This is located within the section beneath the components grid. The settings displayed are relevant to the highlighted item.

In Progress: This flag indicates whether the component item has been confirmed and fully configured or not. An item marked as “In Progress” will not be added to a works order raised for this BOM.
Fixed Quantity: This flag indicates whether the component item quantity is fixed, regardless of changes to the build quantity.
Bulk Issue: This flag indicates whether the item is considered as a bulk issue item or not.
Bulk issue items will be automatically issued to works orders in full, without affecting stock levels.
Note: Traceable items cannot be marked as bulk issue. If you are working with a traceable item the bulk issue check box will be greyed out.
Scrap Percent: This field determines the expected scrap percentage for this component item. It is used, when creating a works order for the bill of material, to increase the required quantity of the component to account for expected scrappages.
Reference: This field can be used to display any relevant references on bill of material or works order documentation.
Operation: This field is used to identify which operation the component will be used. This is used throughout the system to determine correct ordering dates within Planning, along with works order documentation.
Manufacturing Instructions: This field can be used to advise the operator of any instructions relevant to this specific component item. As per the manufacturing instructions on the main details tab, you can use rich text controls to highlight any relevant parts of the text , to ensure that production staff take notice, when processing subsequent works orders created from this BOM.
Component Analysis Codes
The second tab, located underneath the components grid, details the analysis codes that have been setup in the BOM Settings > Component Analysis.

The type defined against each analysis value will determine the control available.
Duplicate Components
Depending on whether you have enabled the setting to warn about duplicate components, you will receive the following message when adding a component that already exists on the BOM:

This is a warning only. Any action required, due to the duplicate component, will need to be taken.
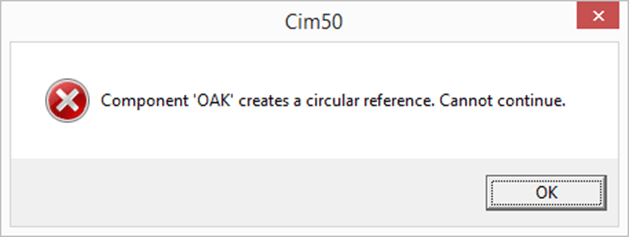
Circular References
Cim50 does not support circular references. A circular reference is a scenario where a product needs itself, to make itself, which may be directly, or through a series of sub-assemblies.
For example, you could have a BOM setup for ‘Product A’ that uses ‘Product A’ as a component. This would be a circular reference. Similarly, if the BOM for ‘Product A’ had a sub-assembly component ‘Product B’, and the BOM for ‘Product B’ used ‘Product A’, that also would create a circular reference.
When you add a component to a BOM, a check is carried out to ensure no circular references are created. If a circular reference is found, you will be presented with the following message, and the component item will be removed from the BOM.
Creating Stock Records
There may be scenarios where someone is working on a BOM and wants to add an item that does not yet exist as a stock record.
If you type in a stock code that does not exist, and assuming you have the appropriate access rights to create a new stock record, you will be presented with the following question:
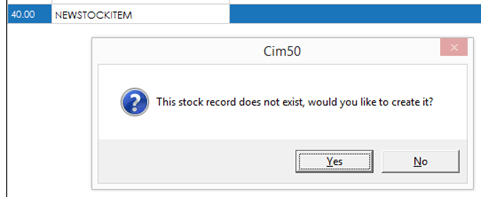
Clicking Yes will load the ‘New Stock Record’ screen, where you can populate all the relevant stock record information.

Upon saving, the information entered into the new stock record screen will be pulled through onto the BOM, ready for a quantity to be entered.

Pressing No will remove the entered stock code from the BOM.
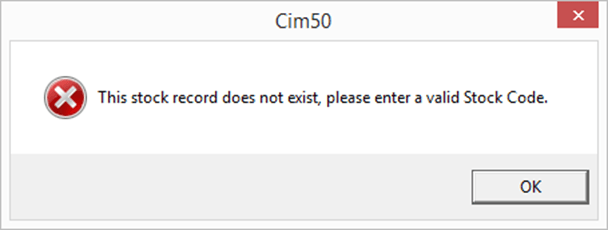
Should you not have permission to create a new stock record, you will be presented with a message advising the item does not exist, and it will be removed from the BOM.
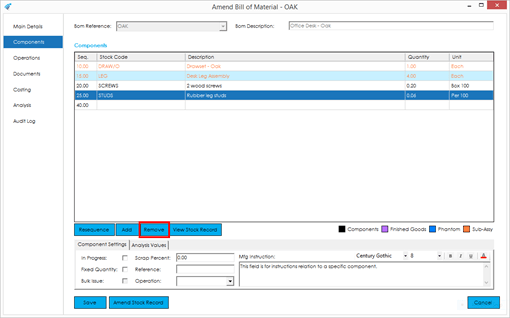
Removing a Component
To remove a component, highlight the item you wish to remove in the components grid (mouse click in any column) and press the Remove button.
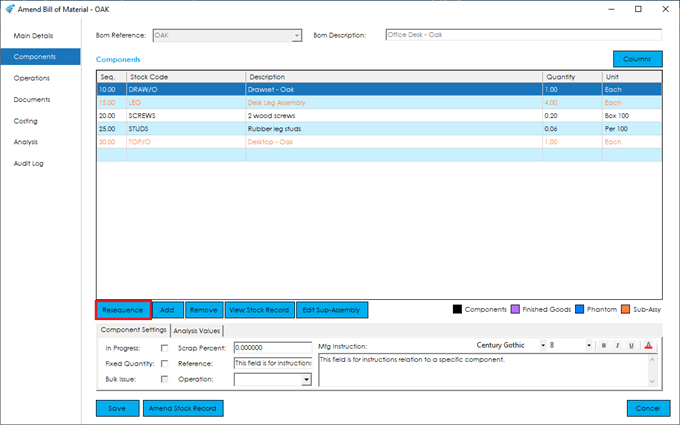
Resequencing Components
There may be occasions where additional components are added to a BOM. As mentioned above, typically components are added in the order they are consumed, so additional components may need to be placed in between existing component items.
Resequencing allows you to “re-sort” the components list. The order they would be resorted in would depend on the setting defined in the BOM Settings. They would either be sequenced in sequence number order, or alphabetically.
Sequence Number Order: When using this method, you’d simply need to change the sequence number of the new item to the appropriate number that you would like it to be located, and press Resequence.
Stock Code Order: This method does not allow you to control the order manually, but rather allows you to sort new items added into the appropriate location in the list based on the stock code.
Once you are ready to re-sequence the component list, press the Resequence button. You will see the list has been re-sorted, with sequence numbers adjusted based on the component sequence intervals.
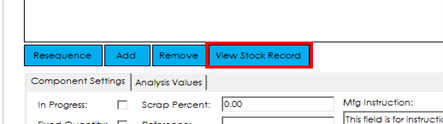
View Component Stock Record
If you have the appropriate access rights, you can view a component stock record, by highlighting the appropriate item in the components grid, and pressing the View Stock Record button.
View/Edit Sub-Assembly
If the item currently highlighted in the components grid is defined as a sub-assembly or finished goods item, a button will be displayed alongside the other component control buttons, labelled Edit Sub-Assembly. You can directly drill down into the BOM for that sub-assembly by clicking the Edit Sub-Assembly button.
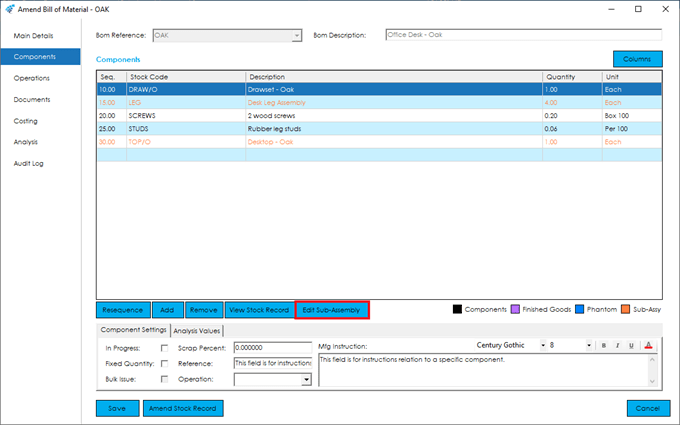
Clicking this will open the ‘Amend BOM’ screen for that item.
See also
Related
Other tasks