Operations Tab
The Operations screen is used to configure the processes that an item must undergo to be manufactured. These are traditionally broken down into individual processes, but depending on the item being manufactured, and the level of detail the customer requires from a processing and cost capture point of view, it can be broken down further, or grouped together as required.
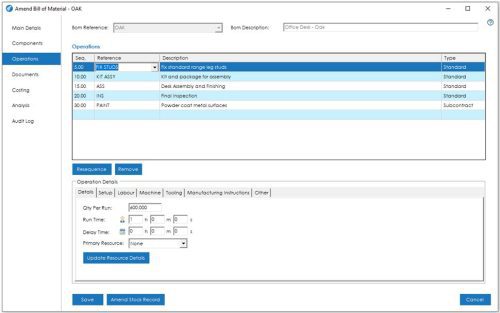
A definition of the columns displayed in the operations grid can be found below:
Seq. (Sequence): This column displays the sequence number for the operation. When adding an operation to this grid, the sequence number will default based on the interval setting defined in the BOM Setting.
Reference: This column displays the operation reference, which can be referenced back to the list of operations defined in the Operations Register.
Description: This column displays the operation description. It is inherited from the Operation Register for that operation and cannot be amended in the Bill of Materials module.
Type: The type of operation. There are 2 types of operation available in Cim50:
Standard: A standard operation is an operation that is processed “in house”, typically by your own employees. This type of operation allows you to define run times, setup, labour, machine, and tooling costs, as well as adding instructions for shop floor paperwork/shop floor data capture enquiry.
Subcontract: A subcontract operation is a process that is carried out externally from your business by a 3rd party contractor. This operation type allows you to define multiple suppliers who could process this operation. You can define purchase order information, quantity pricing breaks, along with the time required for the subcontractor to carry out the process.
Adding Operations
You can add operations to the operations grid by selecting the ‘Reference’ cell on the 1st available empty line and either type the operation reference you wish to add, or use the dropdown control to display a list of available operations setup in the Operation Resources. As you begin to type, a ‘smart search’ will appear, allowing you to either continue typing, or select the appropriate record using the mouse.
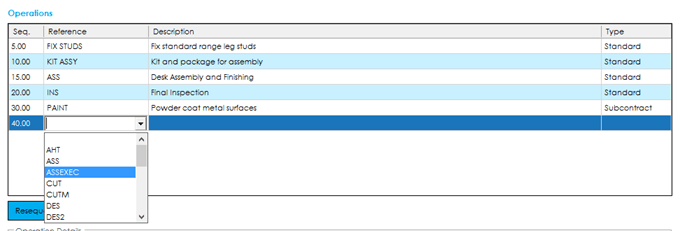
Select the operation you want from the dropdown or press the tab key if you are typing to commit the operation to the grid. This will auto fill the description and type fields into the grid.
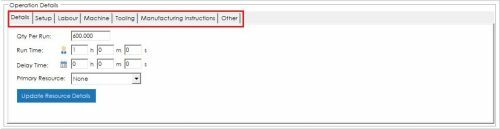
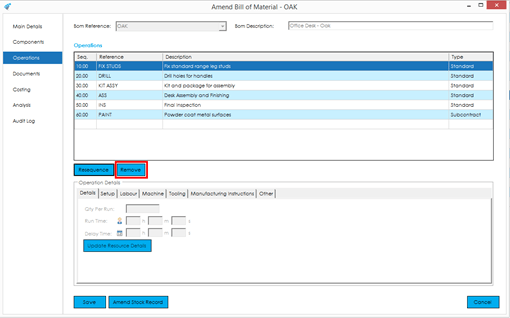
Operation Details
Beneath the operations grid you will find the ‘Operation Details’. This section allows you to input and change the relevant information for the highlighted operation in the operations grid.
Depending on whether you have highlighted a standard operation, or a subcontract operation, you will see one of two screens.
Operation Details - Standard Operations
The ‘standard operation details’ screen is broken down into multiple tabs, allowing you to define the times and costs associated with the operation.
Note: Any details amended or entered into quantity, time and cost fields will impact the costing of the Bill of Material. Further details regarding the costing calculations are included in the Bill of Material Costing section of the knowledgebase.
Details on what each field does, and what impact it has on the operation, is detailed below.
Details Tab
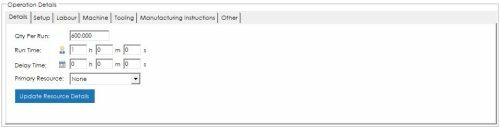
Qty Per Run: This field determines the number of items that you can process in a single run. This is used in conjunction with Run Time, to calculate the production time needed to process this operation.
Run Time: This field determines the amount of time required to process a run, based on the quantity per run above. For example, in the screenshot above, 600 of the finished items could be processed through this operation in 1 hour.
Delay Time: This field determines whether there needs to be a delay before proceeding on to the next operation. For example, if the operation we were creating was a painting operation, and it was a requirement that the paint needs to dry before proceeding to the next operation, a delay time may be used to allow for drying time.
Primary Resource: This is the Primary Resource Calendar that you would like the Planning Module and Works Orders to utilise when planning manufactured items.
For example you may have a Machine that is available 24/7, or a Labour Resource that works part time, you can therefore instruct the system which resource to plan against.
Setup Tab
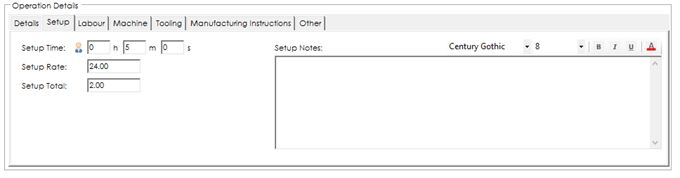
If there is any setup time/costs or instructions associated with this operation, you can specify information on this tab.
Setup Time: Determines the amount of time required to setup this operation. This value would be added to the ‘Run Time’, defined on the details tab, whenever the total production time is calculated.
Setup Rate: This is the hourly cost rate associated with the setup of this operation. This value, and the setup time, are used in calculations when costing the Bill of Material.
Setup Notes: Use this field for any notes or instructions that you want the operator to read when setting up the operation.
Note: The times and costs entered on to the setup tab are used for both production planning (time) and BOM costing (rate/total).
Labour Tab
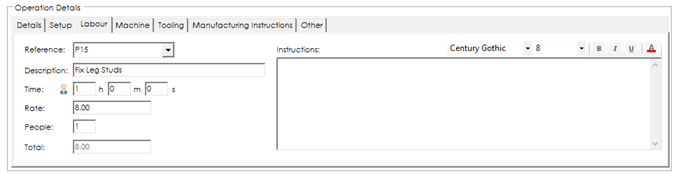
If there is any labour resource requirement with this operation, you can specify the labour resource, time, and cost, along with any instructions on this tab.
Labour Reference: Specifies the labour resource used by this operation. The labour resource must exist in the labour resources register. Default times and costs are pulled through from the labour resource.
If you enter a labour resource that does not exist in the labour resources register, the system will ask you to create it before proceeding.
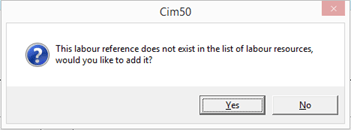
Pressing Yes will open up the ‘Labour Resource Entry’ screen. Once you save the new labour resource to the register, the information defined will be pulled through on to this operation.
Time: Determines the amount of labour time required on this operation.
Rate: This is the hourly cost rate associated with the labour resource of this operation.
People: This field identifies the number of people required for this operation. It is used when calculating costs for the operation.
Instructions: Use this field for any instructions you want the operator to read when processing the operation.
Note: The times and costs entered on to this tab are used for costing purposes only. The time element will not be included in the production planning calculations.
Machine Tab
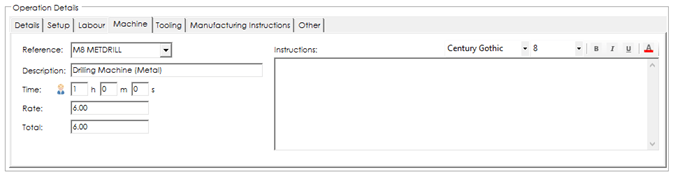
If there is any machine resource requirement with this operation, you can specify the machine resource, time, and cost, along with any instructions on this tab.
Machine Reference: Specifies the machine resource used by this operation. The machine resource must exist in the machine resources register. Default times and costs are pulled through from the machine resource.
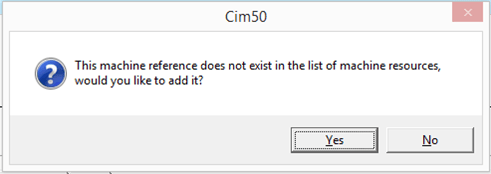
If you enter a machine resource that does not exist in the machine resources register, the system will ask you to create it before proceeding.
Pressing Yes will open up the ‘Machine Resource Entry’ screen. Once you save the new machine resource to the register, the information defined will be pulled through on to this operation.
Time: Determines the amount of machine time required on this operation.
Rate: This is the hourly cost rate associated with the machine resource of this operation.
Instructions: Use this field for any instructions you want the operator to read when processing the operation.
Note: The times and costs entered on to this tab are used for costing purposes only. The time element will not be included in the production planning calculations.
Tooling Tab
If there is any tooling requirement for the operation, you can specify the tooling resource, quantity, and cost, along with any instructions on this tab.
Tooling Reference: Specifies the tooling resource used by the operation. The tooling resource must exist in the tooling resources register. Default values are pulled through from the tooling resource.
If you enter a tooling resource that does not exist in the tooling resources register, the system will ask you to create it before proceeding.
Pressing Yes will open up the ‘Tooling Resource Entry’ screen. Once you save the new tooling resource to the register, the information defined will be pulled through on to this operation.
Quantity: Determines the number of times the tooling resource can be used on this operation, before requiring replacement.
Unit Cost: This is the unit cost associated with the tooling quantity of the operation to determine the tooling cost based on the costed quantity of the Bill of Material, when costing the Bill of Material.
Instructions: Use this field for any instructions you want the operator to read when processing the operation.
Manufacturing Instructions Tab
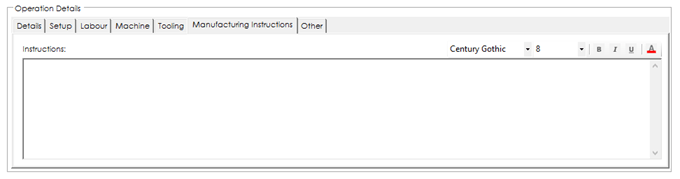
Instructions: Use this field for detailing Manufacturing Instructions on this operation.
Other Tab
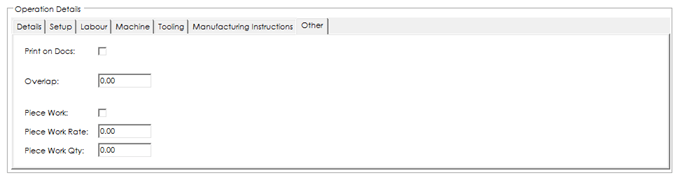
Print on Docs: Determines whether this operation will print out on Bom/Works Order documentation.
Overlap: Determines whether the next operation can overlap this one, and by how much (expressed as a percentage).
Note: When the system is calculating the required production time for a job, if an overlap percentage is determined, it effectively shortens the overall production time by the amount of overlap.
For example, if this operation took 10 hours, and had an overlap percentage specified of 60%, the next operation could start once 60% of this operation was complete, or 6 hours into this operation, with the remaining 4 hours running simultaneously with the next operation. Resulting in the total job time being 4 hours shorter overall.
Piece Work: This field determines whether the operation is costed on a piece work basis or not.
Piece Work Rate: If the operation is costed on a piece work basis, this field determines the rate per quantity specified below.
Piece Work Quantity: If the operation is costed on a piece work basis, this field determines the quantity per rate specified above.
Operation Details - Subcontract Operations
The ‘Subcontract Details’ screen details the subcontract supplier details, costs and timings, for this operation. You can define multiple subcontract suppliers (up to 5), with one being defined as the preferred supplier. The values entered against the preferred supplier will be used by the system for production planning and costing purposes.
Note: Any details amended or entered into quantity and cost fields will impact the costing of the Bill of Material. Further details regarding the costing calculations are included in the Bill of Material Costing section of the knowledgebase.
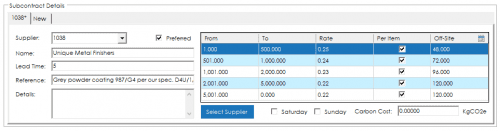
Supplier: Select the supplier reference for this operation. If you do not know the supplier account reference, press the Select Supplier button that will allow you to search for suppliers by name.
Preferred: This field determines whether this is the preferred supplier for this operation. The preferred supplier is used by default when a works order is created.
Note: When processing a works order, you have the option to change the subcontract supplier that will be used for that works order, being able to select from the suppliers defined on the BOM.
Lead Time: The lead time the supplier requires for this operation.
Reference: This field is used on the subcontract purchase order that would be raised to the supplier during the production process and can be used to outline the work required.
Details: This field is used on the subcontract purchase order that would be raised to the supplier during the production process and can be used to provide additional details on the work required.
Quantity Breaks Grid: You can specify up to 5 quantity breaks per supplier, including quantities from and to, the rate for that quantity break, if the rate is on a per item basis or not, and finally the time off site for the quantity break being specified.
Note: The time off site should be specified as the number of hours the job will be off-site for, based on a 24/7 calendar, rather than your own working hours.
Saturday: This field identifies if the supplier works Saturdays.
Sunday: This field identifies if the supplier works Sundays.
Carbon Emissions: If the system is enabled to capture carbon emissions, an additional ‘KgCO2e’ field will be visible. You can define a carbon cost for a subcontract operation on the Bill of Material. Typically, this figure is difficult to quantify, and consequently there is a single figure that can be entered and used by the system for each works order that is processed.
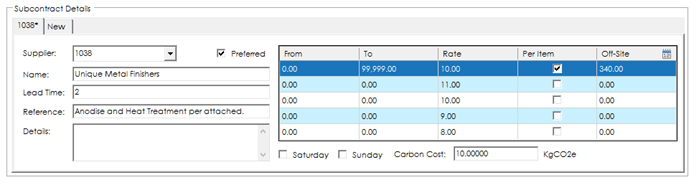
In the example above, 10kgCO2e has been defined as the carbon cost for this operation. That figure is quantity dependent. If for example a works order was raised for a quantity of 10, each 1 would have a carbon cost of 1 KgCO2e.
Note: The times and costs entered on to the quantity breaks grid, along with the ‘Saturday’ and ‘Sunday’ flags for the preferred supplier, are used for both production planning and BOM costing purposes.
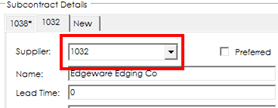
Adding Additional Subcontract Suppliers: Should you wish to define multiple subcontract suppliers; you can add the details for each additional supplier by clicking on the ‘New’ tab.
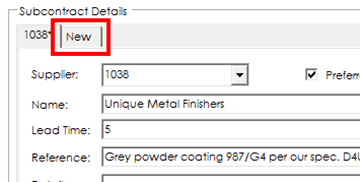
This will open a new supplier tab, where you can select the supplier, and define the information for that supplier, as required.
Once you have selected a supplier reference, you can then define the other fields on the tab.
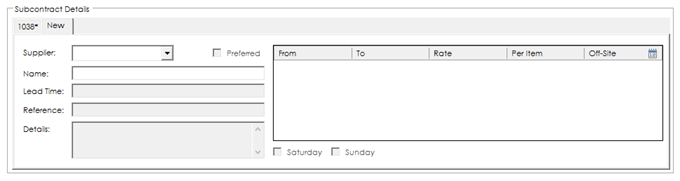
Removing a Subcontract Supplier: If you wish to remove a subcontract supplier from the BOM, select the relevant supplier tab and clear the ‘Supplier’ reference field, then press tab, or click out of the field.
This will revert the tab back to a ‘New’ tab, ready to enter different supplier details into, if required.
Resequencing Operations
Typically, operations are added to a BOM in the order they are to be processed. There may be occasions where additional operations are added to a BOM, and those new operations may need to be placed in between existing operations.
Resequencing allows you to “re-sort” the operations list using the standard operation sequence intervals.
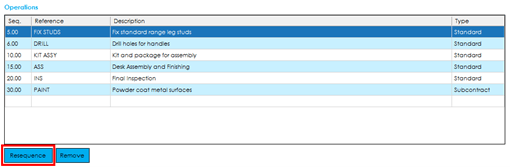
Operations are sorted in sequence number order. If you had the following operations listed on a BOM,

and wanted to add an additional operation in between operation sequence 5 and 10, they could set it to have a sequence number 6, 7, 8 or 9.

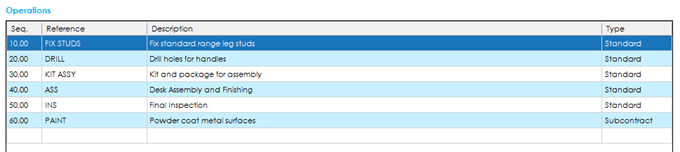
The next time they open the BOM, it would be displayed in the correct order, but not using your standard intervals.
Pressing the Resequence button would change the operation sequences using your standard operation intervals.
Note: You can re-sequence at any time. You do not need to save and reopen the BOM for the re-sequence to be performed.
Removing Operations
To remove an operation, highlight the operation you wish to remove in the operations grid (mouse click in any column) and press the Remove button.
Creating New Operations
You can create new operations as part of the process of creating a new BOM. This is an efficient way of entering a new BOM with new processes on to the system, without having to jump around between various screens.
If you enter an Operation Reference that does not exist in the Operations Register, you will be presented with the following prompt:
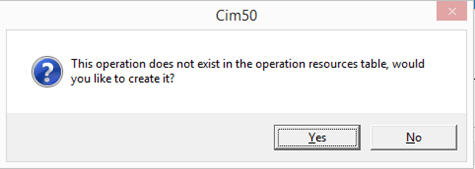
Pressing Yes will open the ‘Operation Resource Entry’ screen (as outlined in the Operations Resource Register section of this guide). Once you save the new operation resource to the register, the information defined will be pulled through on to this BOM, which can be adjusted to suit the specific BOM as required.
See also
Related
Other tasks