
The ‘Documents’ screen allows you to add drawings and/or attachments relevant to the Bill of Material. These documents can be referenced on works order paperwork or viewed from within the BOM record.
Home > Knowledgebase > Cim50 > Bill of Materials > Maintaining BOM Records > Documents Tab
The ‘Documents’ screen allows you to add drawings and/or attachments relevant to the Bill of Material. These documents can be referenced on works order paperwork or viewed from within the BOM record.
The drawings grid details the drawings that have been associated with this Bill of Material and displays the drawing number, description, current drawing revision and the dates the drawing is valid from and to.
Note: The valid from/to dates are for reference purposes only. The system will not flag if these dates have expired or are not yet current.

To add a drawing, click on the ‘Drawing Number’ cell in the first empty row of the drawings grid, and use the drop-down box to select the appropriate drawing.
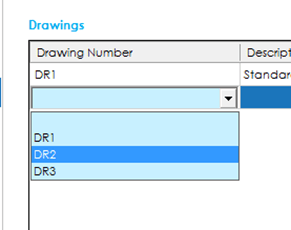
Once selected, the drawing description and valid from/to dates will be pulled through automatically on to the grid.
To remove a drawing, select the drawing you wish to remove from the grid (mouse click in any column) and press the Remove button.
To view a drawing record, highlight the relevant drawing in the grid and press the View Drawing button.
This will open up the drawing record. Further information on the drawing record is available from here.
If a drawing record has any attachments associated with it, you can open and view those attachments by highlighting the drawing record in the grid and pressing the Open Drawing Attachments button.
Note: Drawing Attachments will open in the program defined as the default viewer/editor for the document being opened. Web links are not supported on the Drawings sub-grid; web links belong only on the Attachments sub-grid described below. The Drawing Register workflow is unchanged.
The attachments grid details the attachments that have been associated with this Bill of Material and displays the file path and file name (or URL), along with the description of the attachment. A Type column now shows whether each row is a File, Folder or Web Link.
To attach a file to a BOM, click on the Attach File button and use the browser to select the relevant file you wish to attach. You can then define a description to associate with the document by typing into the ‘Description’ column of the attachments grid.
Note: Cim50 does not take a copy of the file being attached. It simply references it in the location defined by you. Care should be taken to ensure that the location specified is accessible to the appropriate alternative users who may want to view the document.
Therefore, we would recommend avoiding attaching documents from your local disk drive, or from removeable drives such as USB sticks, for example.
To attach a folder to a BOM, click on the Attach Folder button and use the browser to select the relevant folder you wish to attach. You can then define a description to associate with the folder by typing into the ‘Description’ column of the attachments grid.
Note: If you choose to open a folder attachment, assuming you have the appropriate windows folder permissions, you will have access to all files in the folder.
Note: Cim50 does not take a copy of the folder being attached. It simply references it in the location defined by you.
Care should be taken to ensure that the location specified is accessible by the appropriate alternative users who may want to interrogate the folder. Therefore, we would recommend avoiding attaching folders from your local disk drive, or from removeable drives such as USB sticks for example.
To attach a web link to a BOM – for example a SharePoint document, a manufacturer’s data sheet hosted online, or any other web page – click the Attach Web Link button on the Attachments sub-grid. The ‘Add Web Link’ dialog opens with three fields:
URL: The full web address you want to attach. The URL must be a valid absolute address and must use the http or https scheme. If you click OK with no URL, an empty URL, or a URL that does not use http/https, the dialog shows an error message and the dialog stays open so you can correct it. Long URLs – the kind SharePoint typically generates – are supported. Leading and trailing whitespace is automatically trimmed from whatever you paste.
Description: An optional short description for the link, shown in the Description column of the Attachments grid.
OK / Cancel: OK validates and accepts the URL; Cancel closes the dialog without attaching anything.
The link is added to the Attachments grid with the Type column showing ‘Web Link’, and is saved against the BOM when you save the record (it is not committed until you save).
Cim50 does not check that the URL is reachable, or that you have permission to view the document at the other end – that is checked only at the point you open the link. If you change a URL on the host system, you will need to update it on the BOM record.
To open an attachment, highlight the attachment you wish to open in the grid (mouse click on any cell) and press the Open button. File and folder attachments will open using the default program specified in your Windows environment. Web link attachments will open in your default browser; if the link points at SharePoint, your existing Office 365 sign-in is used to authenticate you, so you should not be prompted for credentials by Cim50. If the system is unable to open the attachment, you will be presented with an error message detailing the reason.
To remove an attachment, highlight the attachment you wish to remove from the grid (mouse click on any cell) and press the remove button.
Adding, editing the description of, or removing a web link uses the same access rights as existing file and folder attachments – ‘Amend Bill of Materials – Documents’ to make changes, and the corresponding view permission to see the list and open existing links. No new permission needs to be granted in Role-Management.
Every add, description change, and remove of a web link is written to the audit log so you can review attachment activity alongside file and folder activity:
Audit-log entries appear in the existing Audit Log tab on the BOM record (subject to the BOM audit-log access right) and are searchable by user and by action text using the Quick Search box on the audit log.
Security note: web link attachments only store the URL. Cim50 does not store, copy or proxy the content at the other end of the link. Anyone who can open the BOM’s Documents tab will see the URL and be able to attempt to open it, but the document at the URL is still protected by the security model of the host system (SharePoint, the other website, your file server, and so on). For example, opening a SharePoint URL will only succeed if the user is signed in to Office 365 with an account that has been granted access to that document.