Knowledgebase

Home > Knowledgebase > Cim50 > Planning > Sales Forecasting > Maintaining Sales Forecast

Maintaining Sales Forecast

To enter a new Sales Forecast, select the New option from the Sales Forecast menu. You are presented with a screen that contains the following fields:

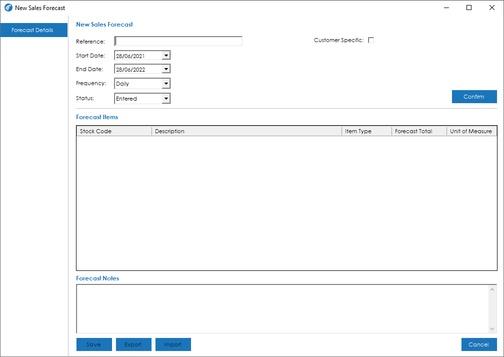
Reference: The reference that you would like to use in the MRP screens when referring to this Sales Forecast. This reference must be unique. If you enter a reference that has already been used, you will be presented with a red ‘X’ and will be unable to save the record (hovering over the X shows the issue).

Customer Specific: If the sales forecast you are entering relates to a specific customer, tick this box, and select the relevant customer. Specifying a customer means that only sales orders for the specific customer will be offset against this sales forecast. If the forecast is not customer specific, leave the tick box unticked, this way, any sales orders for the forecast items will be offset against the forecast, regardless of which customer placed the order.

Start Date: The start date of the Sales Forecast, i.e. the date you want to start forecasting from.

End Date: The end date of the Sales Forecast, i.e. the date you want to stop forecasting on.

Frequency: When entering forecast items, you can enter forecast order quantities on a ‘Daily’, ‘Weekly’ or ‘Monthly’ basis. Select the frequency you would like to use on this forecast.

Status: There are 2 available statuses. By default, a forecast will raise with a status of ‘Entered’. Once you are ready and want the system to recognise the forecast, change the status to ‘Released’. The Demand Schedule will only include Sales Forecasts with a status of ‘Released’.

Once you are happy with the forecast details, press Confirm to start entering items.

Note: once you have confirmed the settings for this forecast, you will be unable to change any of the settings above.

Forecast Items: Using the Forecast Items grid, enter the relevant stock codes that you would like to add on to the forecast. When it comes to entering forecast quantities, you can either enter a value in to the ‘Forecast Total’ box, which will then get apportioned out equally across the Days/Weeks/Months in the forecast, or, you can specify the relevant forecast quantities for each Day/Week/Month, which will update the Forecast Total figure as you go.

Note: Enter any notes relevant to the sales forecast.

Importing/Exporting Sales Forecasts

Sales Forecasts can be exported out to Excel, where you can populate the contents of the forecast and then import them back into the system. Once you have defined the sales forecast “template” (by pressing the Confirm button), you can export the “template” out to excel to populate if desired.

Note: There is no standard import template available for forecast importing due to the nature of the sales forecast record. Each forecast can be for a different date range with different frequencies. As such you need to setup the forecast record prior to exporting the template.

Note: You can save and close the ‘New’ Sales Forecast after exporting and then import it via the Amend Sales Forecast screen. You do not need to leave the ‘New’ Sales Forecast screen open if you do not want to.

Export: This button will export your sales forecast out into Excel. Excel will automatically open the document once the export is complete. You will be presented with any lines that you have already added to the forecast, along with a column per date period on the forecast.

You can add new lines to the forecast, or amend existing lines as required.

Please ensure that you do not change the worksheet name when amending the excel document.

Once you have finished making the necessary changes, save the file as a .xlsx file on your machine or an accessible network drive.

Note:  The ‘Description’ and ‘Item Type’ fields are for reference purposes only and can be left blank for any new lines you add. For lines where you are entering a forecast figure, the value must be numeric or blank.

Import: Once you have completed working on the export template, you can import it into the forecast. Press Import and select your import file.

A validation check is carried out for the following:

  • Ensure there is a worksheet with the same name as the Forecast Reference field.
  • Ensure all stock records referenced in the import sheet exist in Cim50.
  • Ensure all units of measure specified in the import sheet exist against the relevant stock records in Cim50.
  • Ensure all forecast quantity columns are either numeric or blank.

Once all lines are validated, the import will be processed, and the data grid populated with your imported figures.

Our Software: