Traceable Stock Adjustment
The Traceable Adjustments screen can be used to process a manual adjustment in or out of stock, transferring stock to quarantine, or performing a project issue or return. To process an adjustment, select the appropriate ‘Adjustment Type’ based on the transaction you want to carry out.
All controls on the screen are dynamic, with references changing depending on the traceable type. For example, the button to create a new batch/serial number will show either Add Batch or Add Serial Number depending on the traceable type. For the purposes of this article, we are going to assume we are adjusting a batch traceable item. Serial number items work in the same way from a processing point of view, only the wording on the controls are different.
The screen is broken down into the following sections and the fields within them are described below:
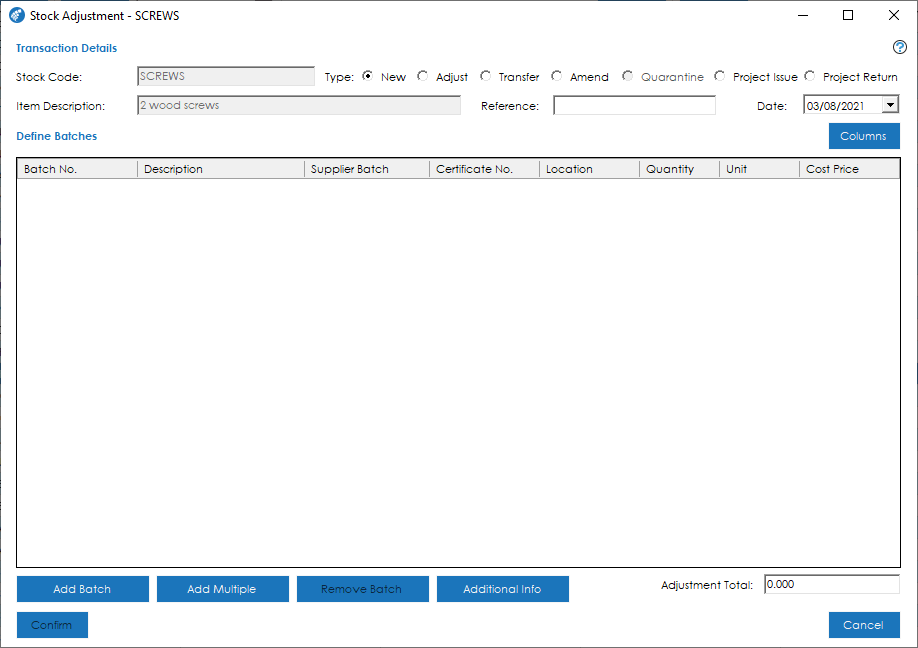
Transaction Details
Stock Code and Item Description: These are the details of the Stock Record being adjusted and appear on the left-hand side of the screen.
Type: Five radio buttons are used to determine the type of adjustment transaction that will be carried out. These are as follows:
New – Creates new batches/serial numbers and makes an adjustment of their quantities into stock.
Adjust – Allows the adjustment of a quantity in or out of stock of an existing Batch or Serial Number record.
Transfer – This allows the Batch or Serial number to be moved from one Bin Location to another.
Amend – No stock movements are made, but this option allows the amendment of data such as Suppliers Batch and Certificate No. etc.
Quarantine – Processes the movement of a quantity to the Quarantine area of the Cim50 Stock Control Module.
Note: This option is only available if the Stock Item has been set as a ‘Quarantine Item’ in the Main Details section of the Stock Record.
Reference: This is the reference to be used for the adjustment transaction and will be used by Sage 50 Accounts to complete the transaction.
Note: This is a mandatory field for ‘New’ and ‘Adjust’ transaction types and will default to ‘Stock Transfer’.
You are unable to overtype this for the ‘Transfer’ transaction type and is not available when selecting the ‘Amend’ or ‘Quarantine’ transaction types.
Date: The date of the transaction, this can be back or forward dated.
Once the Transaction Type has been selected, they work in the following manner.
Columns: The columns button allows you add additional columns to the traceable grid to allow for quicker/easier data entry.
Column selection works in the same way as outlined in section 2.1.1.2. The columns available for selection include the “Additional Info” traceable fields, such as ‘Use By Date’, ‘Sell By Date’ and ‘Notes’, along with any Traceable Analysis Codes that have been setup in the system.

In the screenshot above we have added the ‘Sell By Date’ and ‘Additional Info’ fields to the grid.
Once the columns are added to the grid, you will be presented with the appropriate controls for the field data type when interacting with that field. For example, the ‘Sell By Date’ column would present the user with a Date Picker.
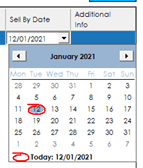
Note: The columns selected will appear in all traceable screens throughout the system. Similarly, if you were to select the columns on another screen, they would be applied to this screen the next time you accessed it.
New Transaction Type
The new screen allows you to create new batches/serial numbers to adjust them into stock and increase the overall stock quantity of the Stock Code selected.
By clicking the Add Batch button, a single line for a Batch or Serial Number will be added to the grid at a time.
Adding multiple lines is particularly useful if several Batches or Serial Numbers are being added to stock at the same time, or there is a need to split a batch across multiple Bin locations in the stores.

For speed of data entry, click the Add Multiple button, to be prompted for the number of records that should be added to the grid.

Once the Batch or Serial Numbers have been added to the grid, data can be entered into the following fields against each individual Batch or Serial Number:
Batch/Serial Number: The identifier of the Traceable Item Record. This field is mandatory and is only editable if ‘Auto-Numbering’ is switched off for this Stock Item in the Traceability section of the Stock Record.
Description: This is a description of the Traceable Item record.
Supplier Batch: The Supplier Batch Number, if different to the Batch or Serial Number.
Supplier Cert: The Certificate Number provided by a supplier or the business.
Location: The location of the Batch or Serial Number in the warehouse/stores. This can be selected from the dropdown list of locations that have been used in the past.
Note: If the desired location is not available in the dropdown list a new location can be entered and will be added to the dropdown list in future. (This is termed as a self-learning field).
Quantity: The Quantity to be booked into stock against the Traceable Item Record.
Note: For Serial Numbers, the quantities are locked to one single unit, for example ‘1 Each’.
Unit: The Unit of Measure that the Quantity and Unit Cost relate to. If an alternative to the Stock Unit is selected from the dropdown, the transaction and quantity will be converted to the Stock Unit using the Conversion Ratio set for the Unit selected.
Note: The Unit of Measure must be present in the Units of Measure section of the Stock Record.
Unit Cost: This is the cost of the goods being booked into stock. This will default to the Last Cost Price from the Stock Record, however, can be amended accordingly and will be used within the Stock History, Traceable Record History and update the Last Cost Price of the Stock Record if amended.
Additional Details
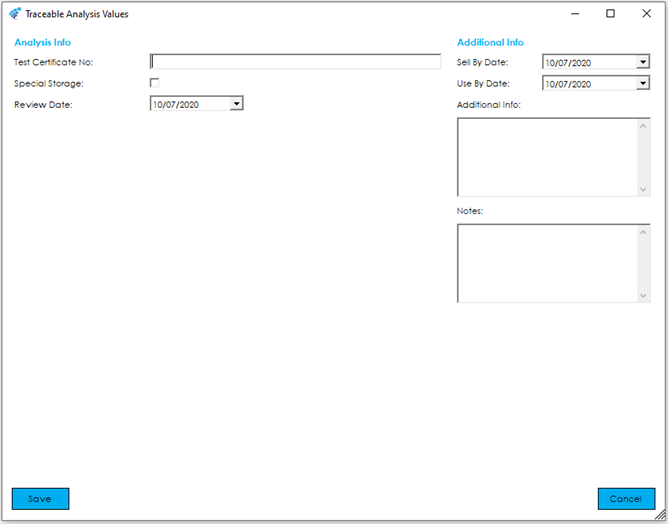
You can access and update traceable Analysis Codes and additional fields such as Use By and Sell By dates by selecting the Additional Info button at the bottom of the screen.

With a traceable record highlighted, selecting the Additional Info button will show the Traceable Analysis Values screen as shown below.

The screen is broken down into the following sections and the fields within them are described below:
Analysis Info
Up to 20 fields can appear in this area and are setup via Settings > Stock Control> Traceability Analysis Section within Cim50.
The field type specified for the analysis code will determine the entry control available, there are 4 types of analysis fields available in Cim50 as follows:
Boolean: True or False values (Check Box)
DateTime: Date values
Numeric: Number values
Text: Text values
For Text and Numeric type fields, the Entry Method can be set to ‘Free Text’ or ‘Selection’. If ‘Selection’ is chosen, this will allow a list of pre-defined options to be setup, allowing one entry to be set as a default. This will result in these values being available to select when entering a Traceable Record, and default value populated accordingly.
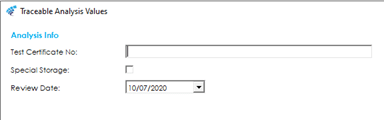
To Save the Additional Info click the Save button in the bottom left and the Cancel button in bottom right to Cancel.

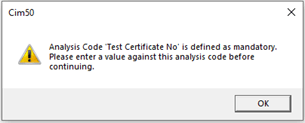
An analysis code can be set as mandatory and must have an entry. If not, this will result in a warning as follows:
A Confirm button is available in the bottom left of the screen, which will commit the ‘New’ transaction type to the database, creating Batch and Serial Numbers in Cim50 and updating the Stock Quantity and History against the Product Record in Sage 50.

The Cancel Button will abort the New transaction.
Adjust Transaction Type
The adjust screen allows you to make quantity adjustments to increase or decrease a Batch quantity or set Serial Numbers back to one or zero them.
In addition to the fields available in the Transaction Details section of the ‘New’ transaction type, there is a Quick Search facility. This allows you to search for a specific Batch/Serial Number using the columns showing on the grid. There is also a check box to only show Batch/Serial Numbers that are currently in stock, which will reduce the list shown on screen.
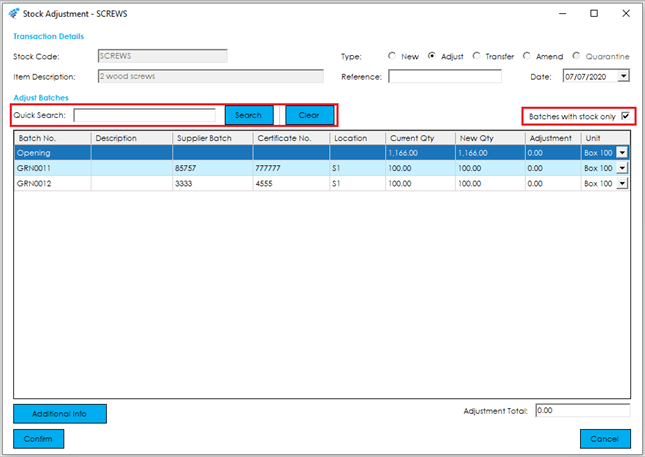
Once you have located the batch in the grid that you wish to adjust, simply enter the correct quantity into the ‘New Qty’ column. You will be able to see the calculated adjustment quantity in the ‘Adjustment’ column. It is also possible to enter a value in the Adjustment column and this will recalculate the ‘New Qty’.

Should you wish to make the adjustment using an alternative unit of measure, simply select the desired unit of measure from the ‘Unit’ column. You will note that the ‘Current Qty’ and ‘New Qty’ columns will change to reflect the quantity based on the selected Unit of Measures conversion ratio.
Note: The Unit of Measure must be present in the Units of Measure section of the Stock Record.

The Additional Info button in the bottom left of the screen, allows you to review the additional data, however this can only be amended using the ‘Amend’ transaction type and is purely for viewing in this instance.
A Confirm button is available in the bottom left of the screen, which will commit the ‘Adjust’ transaction type to the database, adjusting Batch and Serial Numbers in Cim50 and updating the Stock Quantity and History against the Product Record in Sage 50.
The Cancel Button will abort the Adjust transaction.
Transfer Transaction Type
The transfer screen gives you the ability to move a Batch/Serial number between locations.
In addition to the fields available in the Transaction Details section of the ‘New’ transaction type, there is a Quick Search facility, allowing you to search for a specific Batch/Serial number using the columns available in the grid.
The Reference field will be set to ‘Stock Transfer’ and is not amendable.
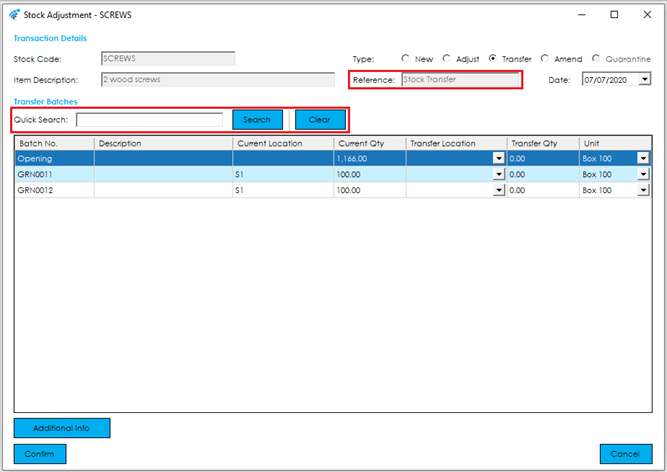
To carry out a transfer, highlight the batch you wish to transfer, select the location you wish to transfer it to using the dropdown list of historical locations in the ‘Transfer Location’ column, and enter the quantity you wish to transfer.
Note: If the desired location is not available in the dropdown list, a new location can be entered and will be added to the dropdown in future. (This is termed as a self-learning field).

Should you wish to make the adjustment using an alternative unit of measure, simply select the desired unit of measure from the ‘Unit’ column. You will note that the ‘Current Qty’ and ‘Transfer Qty’ columns will change to reflect the quantity based on the selected Unit of Measures conversion ratio.
Note: The Unit of Measure must be present in the Units of Measure section of the Stock Record.

The Additional Info button in the bottom left of the screen, allows you to review the additional data, however this can only be amended using the ‘Amend’ transaction type and is purely for viewing in this instance.
A Confirm button is available in the bottom left of the screen, which will commit the ‘Transfer’ transaction type to the database, adjusting Batch and Serial Numbers in Cim50 and updating the Stock Quantity and History against the Product Record in Sage 50.
The Cancel Button will abort the Transfer transaction.
Amend Transaction Type
The amend screen allows you to make field level changes to a Batch/Serial Number. For example, you could correct a “typo” on a Supplier Batch or amend an Analysis Code value as required.
In addition to the fields available in the Transaction Details section of the ‘New’ transaction type, there is a Quick Search facility, allowing you to search for a specific Batch/Serial Number using the columns available in the grid.
As no stock movement will be taking place, the Reference and Date fields will be greyed out and are not amendable.
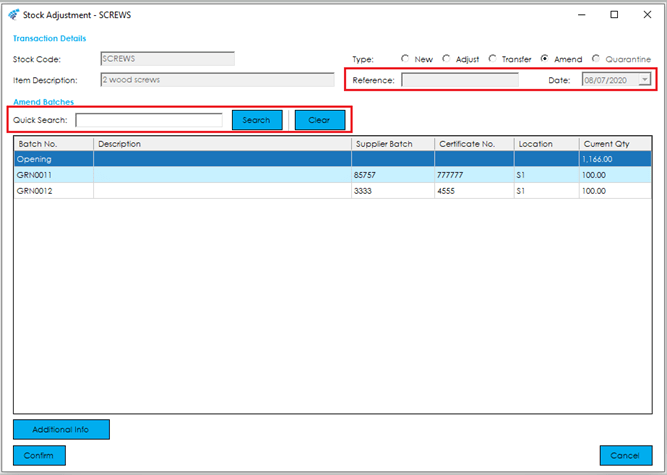
Select the field you wish to amend, and update the value as required.
The Additional Info button in the bottom right of the screen allows this data to be reviewed and amended. This would include Analysis Codes and Use By Dates etc.
Note: It is not possible to adjust quantities or the locations via the ‘Amend’ screen. To carry out these adjustments the ‘Adjust’ or ‘Transfer’ transaction types will need to be used.
A Confirm button is available in the bottom left of the screen, which will commit the amendments to the database, adjusting Batch and Serial Numbers records in Cim50.
The Cancel Button will abort the Amendments.
Quarantine Transaction Type
The quarantine transaction type allows you to transfer stock into quarantine on an ad-hoc basis. If you have an issue with a batch/serial number, or would like to carry out a random inspection, you can transfer stock to quarantine from here.
Note: This option is only available if the Stock Item has been set as a ‘Quarantine Item’ in the Main Details section of the Stock Record.
In addition to the fields available in the Transaction Details section of the ‘New’ transaction type, there is a Quick Search facility, allowing you to search for a specific Batch/Serial number using the columns available in the grid.
The Reference field has been replaced by Reason. This will allow a reason for the move to quarantine to be selected from the dropdown list of reasons that have been used in the past.
Note: If the desired reason is not available in the dropdown list, a new reason can be entered and will be added to the dropdown list in future. (This is termed as a self-learning field).
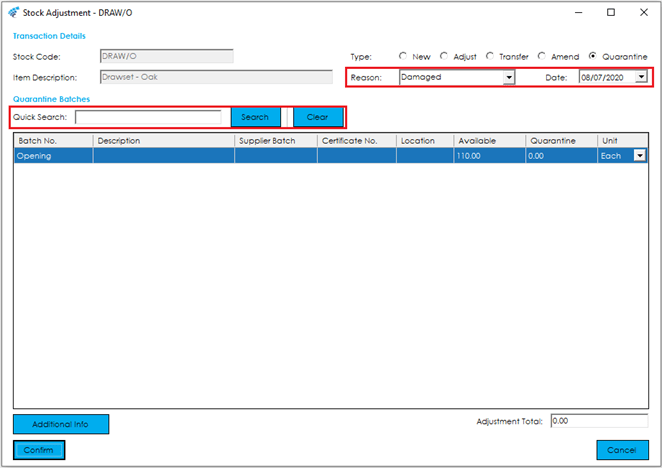
To transfer a batch into quarantine, locate it on the grid, and enter the quantity you would like to quarantine into the ‘Quarantine’ column.
The Additional Info button in the bottom left of the screen, allows you to review the additional data, however this can only be amended using the ‘Amend’ transaction type and is purely for viewing in this instance.
A Confirm button is available in the bottom left of the screen, which will commit the ‘Quarantine’ transaction type to the database, adjusting Batch and Serial Numbers in Cim50 and updating the Stock Quantity and History against the Product Record in Sage 50.
The Cancel Button will abort the Quarantine transaction.
Project Issue Type
The project issue screen gives you the ability to issue stock to a project in Sage 50 Accounts.
In addition to the fields available in the Transaction Details section of the ‘New’ transaction type, there is a Quick Search facility, allowing you to search for a specific Batch/Serial number using the columns available in the grid.
You will also have the ability to select the project and cost code that you wish to issue to the stock to.
Note: These are required fields that must be completed in order to process the transaction.

To carry out a project issue, highlight the batch you wish to issue and enter the quantity you wish to issue to the project.
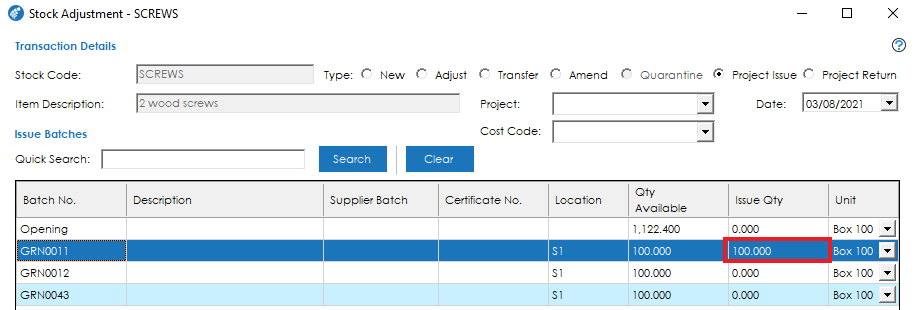
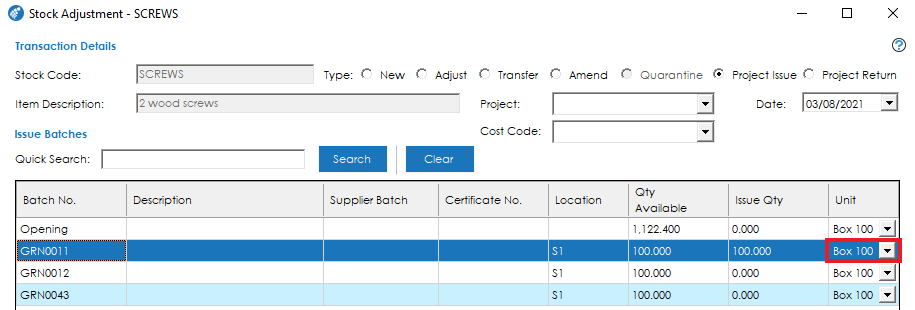
Should you wish to issue the stock using an alternative unit of measure, simply select the desired unit of measure from the ‘Unit’ column. You will note that the ‘Qty Available’ column will change to reflect the quantity based on the selected Unit of Measures conversion ratio.
Note: The Unit of Measure must be present in the Units of Measure section of the Stock Record.
The Additional Info button in the bottom left of the screen, allows you to review the additional data, however this can only be amended using the ‘Amend’ transaction type and is purely for viewing in this instance.
A Confirm button is available in the bottom left of the screen, which will commit the ‘Project Issue’ transaction to the database, issuing the stock to the Project in Sage 50, adjusting Batch and Serial Numbers in Cim50 and updating the Stock Quantity and History against the Product Record in Sage 50.
Once confirmed, you will be asked whether you would like to print a project delivery note.
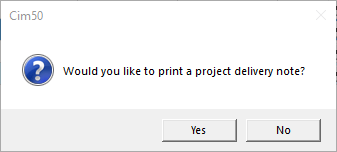
Selecting Yes will open the standard Cim50 report selection window where in you can choose to Print, Preview, Export or Email the Project Delivery Note.
The Cancel Button will abort the Transfer transaction.
Project Return Type
The project return screen gives you the ability to return stock from a project in Sage 50 Accounts.
Initially you will be presented with an empty list of batches/serial numbers available to return to stock. Once you have selected a Project from the Project selection box the list will load up all available batches/serial numbers that were issued to that project.

In addition to the fields available in the Transaction Details section of the ‘New’ transaction type, there is a Quick Search facility, allowing you to search for a specific Batch/Serial number using the columns available in the grid.
To carry out a project return, highlight the batch you wish to return and enter the quantity you wish to return from the project in the ‘Return Qty’ column.
Should you wish to return the stock using an alternative unit of measure, simply select the desired unit of measure from the ‘Unit’ column. You will note that the ‘Qty Available’ column will change to reflect the quantity based on the selected Unit of Measures conversion ratio.
Note: The Unit of Measure must be present in the Units of Measure section of the Stock Record.
The Additional Info button in the bottom left of the screen, allows you to review the additional data, however this can only be amended using the ‘Amend’ transaction type and is purely for viewing in this instance.
A Confirm button is available in the bottom left of the screen, which will commit the ‘Project Return’ transaction to the database, returning the stock from the Project in Sage 50, adjusting Batch and Serial Numbers in Cim50 and updating the Stock Quantity and History against the Product Record in Sage 50.
The Cancel Button will abort the Transfer transaction.
See also
Related
Other tasks