Stock Control List
As with all the modules within Cim50, you are provided with a list view of all Stock Records. This list can be sorted by any of the default column headings or any columns that are added. It can be refreshed to pull through any changes from Sage 50 Accounts, or simply used to select, filter, search, and export to Excel.
Within this article we will review each of these features starting with Columns, Filter, Quick Search and Show Inactive Items, which can be found at the top of the list view.

We will then move onto the features available at the foot of the list view, Select All, Swap, Clear, Refresh and Excel.

Columns
This button allows you to add, remove and change the order of columns in the list view.
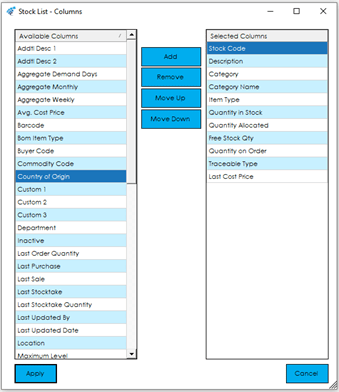
All fields from the Stock Record are available to select as columns, except memo fields. This includes any Analysis Codes setup for the Stock Control Module within the Stock Control Settings. Checkboxes (Booleans) will appear in the list as True (Checked) and False (Unchecked).
The available Columns appear on the left and can be added and removed to the selected columns on the right. The order the columns appear in the list view left to right, is determined by the order they appear from top to bottom, therefore by moving a column up, will move it to the left in the list view.
There is the option to Apply or Cancel the changes made at the bottom of the screen.
These columns are stored in the Cim50 Database against the user and used by Cim50 to build the list view when logging onto Cim50 from any PC with Cim50 installed and configured to the same database.
This functionality is available in list views across all modules of Cim50.
Filtering
The Filter feature allows you to build filters that can be saved and recalled, enabling you to locate the records required in the list view.
When the Filter button is selected the Build Filter feature appears and if a filter has previously been built or selected, criteria will be displayed.
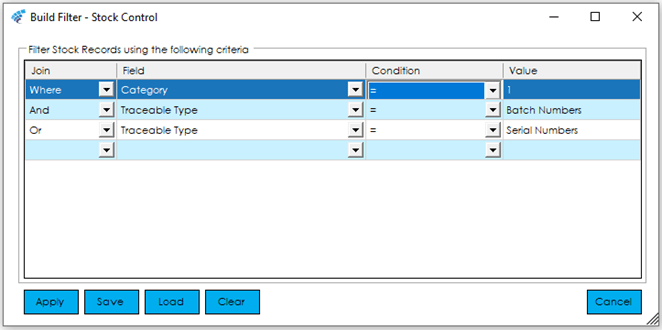
The screen has four fields to be completed and a filter can have any number of clauses assigned to the criteria. The fields are as follows:
Join: In the first instance we would select ‘Where’, but in any subsequent lines we can use ‘And’ and ‘Or’.
The ‘And’ operator displays records if all the conditions separated by ‘And’ are true. For Example – where a Stock Category is Equal to 1 and the Stock Item is Batch Traceable.
The ‘Or’ operator displays records if any of the conditions separated by ‘Or’ are true. For Example – regardless of the Stock Category, the user may also like to include all Serial Numbered Stock Items.
Field: The field you would like the filter to be based on from the Stock Control Module. For Example – you may only wish to view Stock Items with a stock balance, therefore the field to be selected would be ‘Quantity in Stock’.
Condition: There is the option to choose one of the following conditions:

Value: The value that the condition should be based on. For Example – When only the ‘Active’ Stock Items are to be included, the Field used would be ‘Inactive’, the Condition ‘<>’ (Not Equal to the Value Field) and the Value would be ‘True’.
Once the filter has been built, there are options to Apply, Save, Load, Clear and Cancel at the bottom of the screen.

These buttons carry out the following functions:
Apply: This will apply the filter to the Stock Control List View without Saving.
Save: This will allow you to Name and Save the Filter that has been built to be recalled at any time.

If required, the Filter can be marked as ‘Public’ – this will then be available to all users with access to the Stock Control Module the next time they log into Cim50.
When the user selects Apply, the filter is saved to the Cim50 Database, meaning it is available when logging onto Cim50 from any PC with Cim50 installed and configured to the same database.
Load: When clicking this button, you will be given the option to select a Filter that has been previously saved. If a filter has already been selected a warning will appear to confirm if you would like to continue, Yes or No.
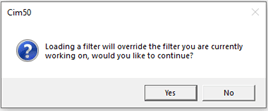
If No is selected you will be returned to the previous screen, if Yes is selected the ‘Load Filter’ Screen will appear for you to select from.
This will show all private and public filters available to you, along with who created them, allowing them to be selected from the grid.
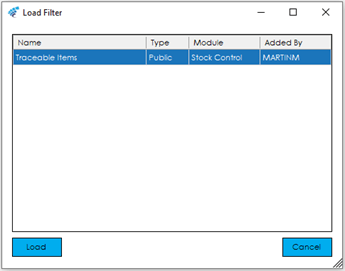
When Load is clicked, the selected filter will appear in the build filter screen and will enable you to apply this to the Stock Control List View.
Following the Load of a filter, you can Delete the filter from the ‘Build Filter’ screen.
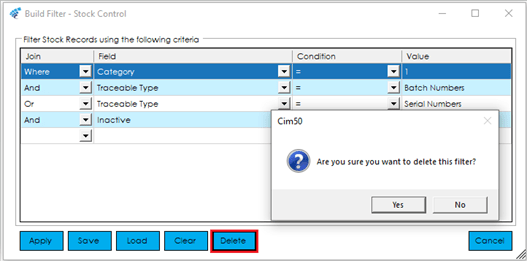
Selecting Yes will delete the Filter that was loaded and No will return to the ‘Build Filter’ screen.
Clear: Using the Clear button will clear all criteria from the grid and when Apply is clicked, all Stock Records will be displayed in the Stock record list view.
Cancel: When this is selected, no changes to the Stock List View will take place.
This functionality is available in list views across all modules of Cim50.
Filter Dropdown
Next to the Filter button there is also the option to select saved filters from a dropdown list.

This allows for the selection of a filter without the option to review the criteria before applying and the Stock Control List View will react accordingly.
This functionality is available in list views across all modules of Cim50.
Quick Search
As well as Filters, there is also the option for Quick Search. This will filter the Stock Control List View based on a string entered in the Quick Search box.
For Example – If we wanted to see a list of all ‘Oak’ stock records, entering ‘Oak’ into the Quick Search would display all items that contained ‘Oak’. This would also find the word ‘Oak’ in any of the other columns on the list view.
Note: You can carry out wildcard searches using the % character. For example, if you wanted to do a search for items which begin with ‘Oak’, you could search for Oak%, this would then only show items which start with ‘Oak’, and not those that end with ‘Oak’ or contain ‘Oak’ within a field value.

Quick Search can also be combined with Filters, as shown in the example below.

The Clear button will remove the entry from the Quick Search, remove the Filter selected, and return the full list of Stock Records.
This functionality is available in list views across all modules of Cim50, we will therefore not cover these again in each module of the knowledgebase.
Show Inactive Items
On the far right at the top of the Stock Item List View there is the option to Show Inactive Items. This relates to the Inactive field on Product Records in Sage 50 Accounts and is also available in Cim50.
With the Show Inactive Items checkbox checked, all Stock Records will appear in the Stock Control List View. If it is unchecked, however, any Stock Items marked as Inactive will be filtered from the list.
This option can also be combined with the Filters and Quick Search to limit the Stock Records that appear in the Stock Control List View.
Select All, Swap, Clear and Refresh
Select All
In the bottom left of the list view screen, the Select All button will highlight (Select) all records.
Note: This will also include any records that meet the search criteria, but are not showing on the screen, due to the number of records.

This functionality is available in list views across all modules of Cim50.
Swap
To the right of the Select All is the Swap button. If this is clicked, it will reverse highlight (Select) those records that were previously selected. This can be particularly useful if only a small number of records are to be excluded from the selection. As with the Select All, this could include records that are out of view.
For the selection of records, standard windows functions i.e. Control and Shift, work in Cim50 list views.
This functionality is available in list views across all modules of Cim50.
Clear
The Clear button will un-highlight (un-select) any records currently highlighted (selected).
This functionality is available in list views across all modules of Cim50.
Refresh
The Refresh button will update the list to include any changes to records made by other users since the list was last created or refreshed.
This functionality is available in list views across all modules of Cim50.
Excel
Working in conjunction with Columns, Filters, Quick Search and Show Inactive Items, if the Excel button is selected, the records and columns shown in the list view will be exported to Excel. As with the Select All and Swap, this could include records that are out of view.
Note: A compatible version of Excel will need to be installed and licenced on the PC to enable this function. If ALL records are selected, this can take some time to export.
The following example shows the Excel export with an ‘Oak’ Quick Search used. Only records included within these criteria are exported to Excel.

This functionality is available in list views across all modules of Cim50.
See also
Related
Other tasks


