Receive Goods
Sage 50 Accounts Purchase Orders can be received through this feature if they are ‘On Order’ i.e., have outstanding ‘To Deliver’ Purchase Order Line quantities.
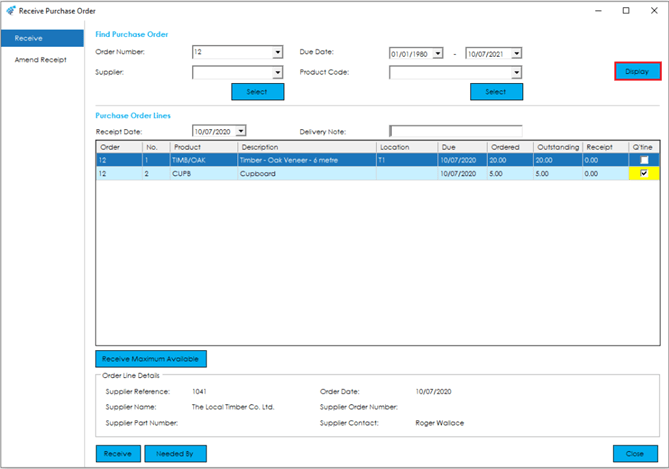
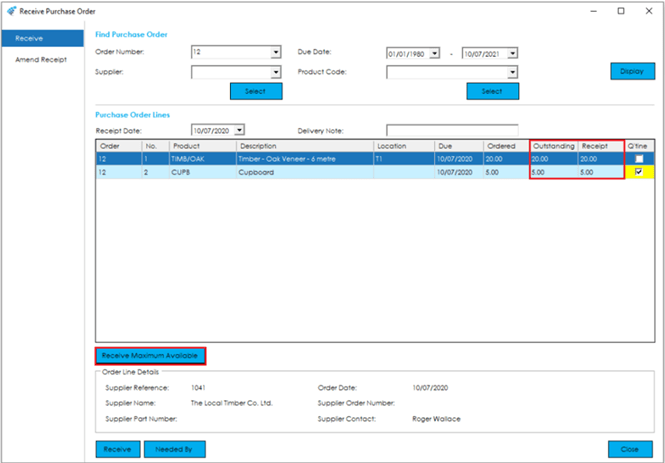
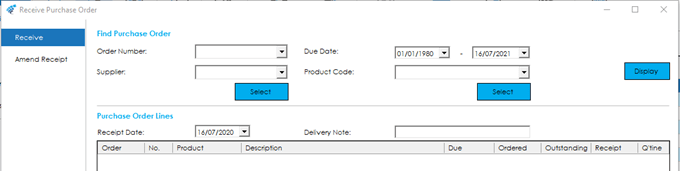
To receive goods, you first need to search for the item(s) you want to receive. To do this, you can enter/select the appropriate criteria in the ‘Find Purchase Order’ section at the top of the screen.

This allows the ability to not only search for a specific Purchase Order or Supplier, but also Product Code, which is particularly useful if the Purchase Order and Supplier is unknown or multiple Purchase Orders for the same item exist. There is also the option to search within a certain due date range, for example what is due today and/or overdue.
Once you have entered your search criteria, press the Display button to populate the receipt grid with all outstanding order lines that match your search criteria.
Note: You cannot receive an order that is being edited. If your criteria search results in an order being pulled through that is currently being edited, you will be presented with the following message: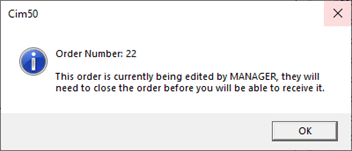
This message displays the order that is being edited, and who is editing the order. That person will need to close the order before the receipt can be processed.
The purchase order receipt screen is broken down into the following sections, and the fields within them are described below:
Purchase Order Lines
At the top of this section there is the ability to specify the receipt date and supplier’s delivery note number as required.
Note: Within the Settings> Stock Control> Stock Settings this field can be set as mandatory.
In the grid you will see all the order lines that match your search criteria entered. Depending on your search criteria, you may see multiple lines from multiple orders, allowing you to receive multiple purchase orders from the same supplier at once.
The grid shows the Purchase Order Number, Line Number on the Purchase Order, the Product Code with Description, Due Date, along with the Quantity Ordered and Quantity Outstanding.
The quantity being received can be entered into the ‘Receipt’ column.
If the quantity being received is higher than that ordered, by default this is not allowed, and the following message will appear:
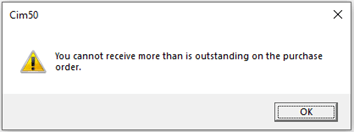
Clicking OK will set the Receipt Quantity back to the Outstanding Quantity.
There is a setting, however, within Settings> Stock Control Settings> Stock Settings, called ‘Allow users to over Receive’. When checked, this allows the quantity received to be higher than the outstanding quantity, and will prompt the following message:
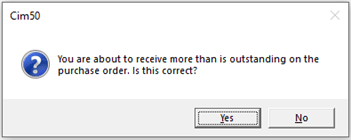
When Yes is selected, the Receipt will continue with the quantity entered and when No is selected, the Receipt quantity will be set back to the Outstanding Quantity.
Note: If the additional quantity is accepted, the Purchase Order line quantity in Sage 50 Accounts will be increased to reflect this. This is because Sage 50 Accounts does not allow over receipts.
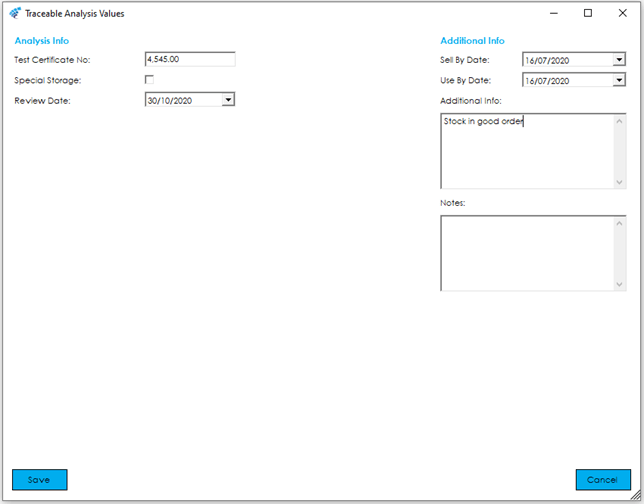
Once the quantity has been entered and accepted, if the item is Traceable, the following screen will appear, allowing you to enter data in the same way as creating new Traceable Records when carrying out a Stock Adjustment, recording Batch/Serial Numbers, Certificate Numbers and Locations. Please see Traceable Stock Adjustment (New) for further details.
Note: Within the Settings> Stock Control Settings> Stock Settings, the Location can be set to Mandatory for Traceable items. (Batch and Serial Numbers).This is not the case for non-traceable items as Sage 50 does not store the location against the stock transaction.

This includes the Additional Info screen where further data analysis can be entered, such as Sell By Dates and Analysis Codes etc. This can be accessed by clicking the Additional Info button, highlighted above.
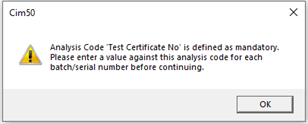
If there are any mandatory Analysis Codes that need completing, the following message will appear before returning to the Receive Purchase Order screen.
Note: The traceable additional info and analysis codes can also be added to the traceability grid via the ‘Columns’ button in the upper right corner of the screen. More information on the ‘Columns’ option is available here.
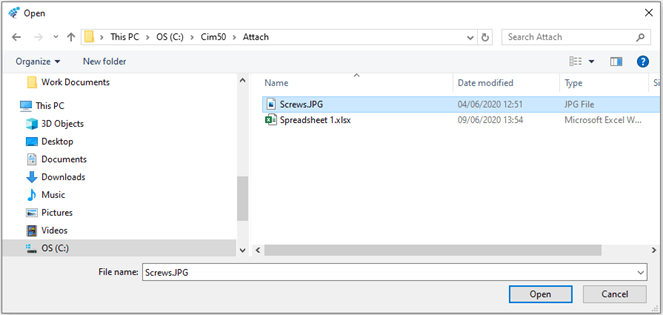
There is also the option to Attach Documents to the Traceable record such as Certificates and Delivery Notes etc. When the Attach Document Button is clicked, a Windows ‘Open’ screen appears, allowing the user to browse to the file required.
Note: It is recommended this is a network drive that all Cim50 users have access to.
Once the files have been selected, they will be available to view from Traceability enquiries and from this screen via the View Attachment button highlighted below:

Once you have finished defining the batch/serial numbers, press Confirm to return to the main order receipt screen.
The final column in the grid ‘Q’tine’ highlights if the Product is to be received into Quarantine by default (As set on the Stock Record, Main Details Section).

This also provides the option to uncheck or check the field, to optionally not book the stock to Quarantine if it does not require inspecting, or checking it, if it is damaged on receipt.
Receive Maximum Available
The Receive Maximum Available button that can be selected to pre-fill the Receipt column to match the Outstanding Quantities, to speed up data entry.
For Non-Traceable Stock Items, the receipt quantity will populate with no further data entry required and for Traceable Stock Items, the ‘Define Batch/Serial Numbers’ Screen will appear for further data entry. Its operation is covered in the Receive, Needed By, and Close section below.
Order Line Details
This area of the screen provides additional information regarding the Purchase Order and Order Line selected in the grid above, including the Supplier Details from Sage 50 Accounts, Supplier Part Number from the Cim50 Stock Record Alternative Suppliers section, and Suppliers Order Number from the Purchase Order in Sage 50 Accounts.

Receive
At the bottom of the screen there are three buttons for Confirming the Receipt of Stock, reviewing any Works Orders that requires a Stock Item being received, and the ability to close the screen without receiving stock.

Receive
When the Receive button is clicked, any Purchase Orders lines in the grid with a receipt quantity will be received into Stock. This will update the Quantity in Stock, Last Cost Price and Transaction History in Sage 50 Accounts against the Product Record and will be available in Cim50, detailing the Batch or Serial Number, if applicable, Purchase Order Number, Quantity and Cost Price.

Note: Similarly, with Sage 50 Accounts, the Last Cost Price is updated on Goods Receipt. There is a setting within Settings> Stock Control Settings> Stock Settings that can be checked to warn you if the price on the purchase order is zero, allowing them to abort the goods receipt and amend the Purchase Order in Sage 50 Accounts, prior to receipt.
In addition, there is also a setting in Settings> Stock Control Settings> Stock Settings to Update supplier prices on goods receipt. This will update the price within the supplier’s section of the Stock Item if the Purchase Order has been amended since creating it.
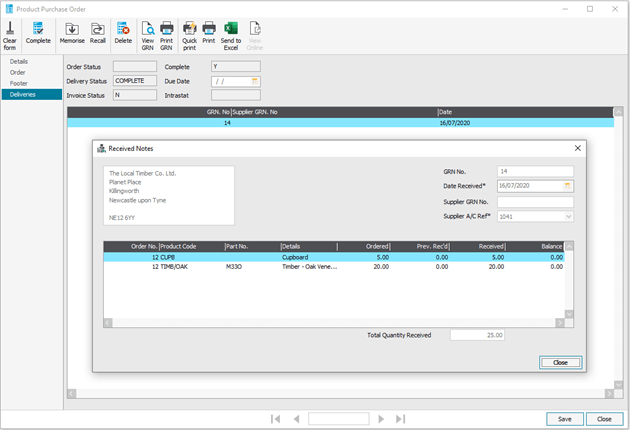
The Purchase Order status in Sage 50 Accounts, will be set accordingly to PART or COMPLETE in the Delivered field/column. The On Order & Delivered quantities of the Purchase Order line will also be updated accordingly with the Deliveries section updated, and the Sage 50 Accounts Received Notes will be available to view and print.
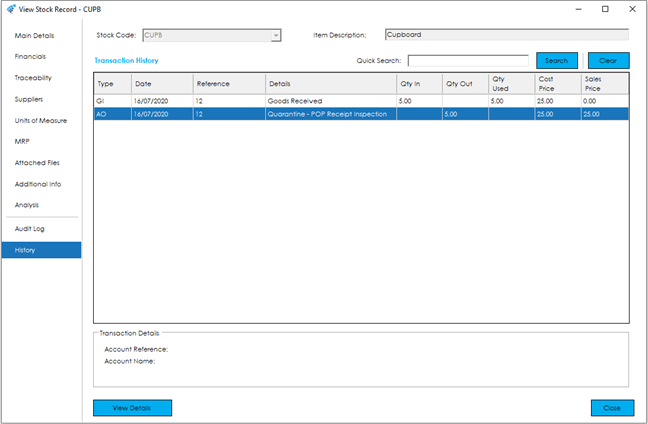
Stock Items that are quarantined will be received in the same way but will automatically be adjusted out of stock to the Quarantine area of the Cim50 Stock Control Module, to be inspected and processed.
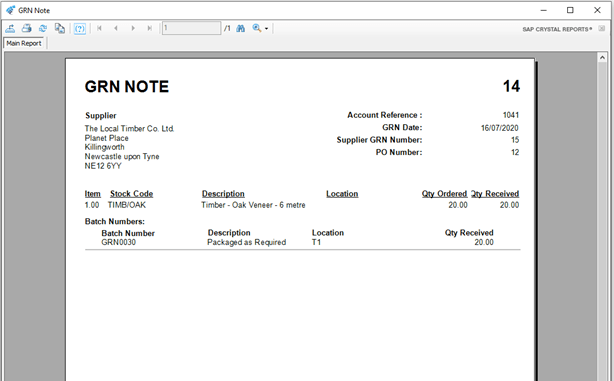
Once these transactions have taken place, you can Preview, Print, Export (To Excel or a PDF etc.) or Email Goods Received Notes.
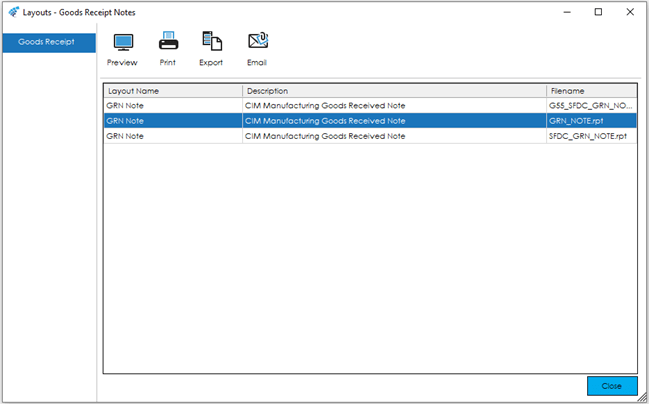
By default, there are two Goods Receive Notes available, a Standard Layout, and a Shop Floor Data Capture (SFDC) Version that includes Bar Codes.
Note: These Layouts can be amended to suit your requirements using a full version of Crystal Reports and additional Layouts can be added to the system, as is the case in the above example.
Preview
When Previewing the standard Goods Received Note, the following will be displayed using the inbuilt Crystal Viewer installed as part of the Cim50 installation.
From the Crystal viewer there is the option to Print to a Windows printer and Export the Layout to Excel or a PDF etc.
If the Layout runs across multiple pages these can be navigated using the cassette keys at the top of the screen, and there is also the option to Zoom and search within the Layout.

Once Printed or Exported, the Preview can be closed using the ‘X’ in the top right hand corner of the screen.
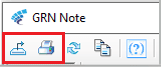
Print
If the Print button is selected, the Windows ‘Print’ dialog will appear allowing the Layout to be printed accordingly.
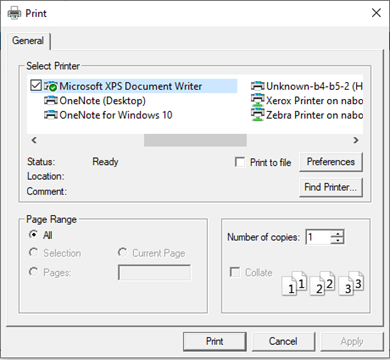
Export
If the Export button is selected, the ‘Export Report’ dialog will appear, allowing the Layout to be exported to various file types, renamed, and saved in a location of the user’s choice.
Email
When the Email button is selected, the ‘Email Report’ dialog will appear, allowing the Layout to be exported to various file types and Emailed as required.
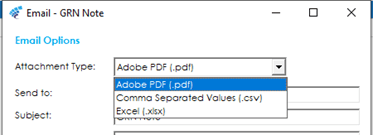
Once the Attachment Type of PDF, Excel, or Comma Separated Values (CSV) has been selected, you have the ability to enter an email address, amend the Subject & Attachment Name, and enter a message of your choice.
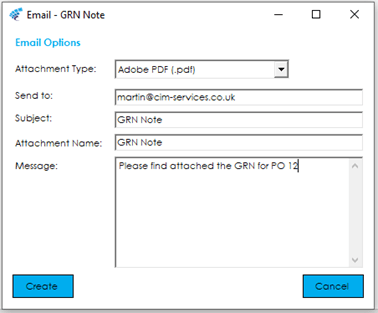
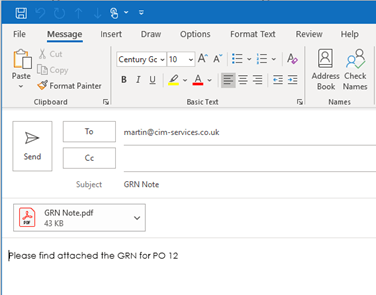
When Create is clicked, this will output to Outlook and allow further amendment of the email before sending.
Goods Receipt Labels
Once the Goods Receipt Note has been Previewed, Printed, Exported or Emailed, if any of the Stock Items received are set to print Goods Receipt Labels, the following Layouts screen will appear, allowing you to select a Label Layout to Preview, Print, Export or Email.
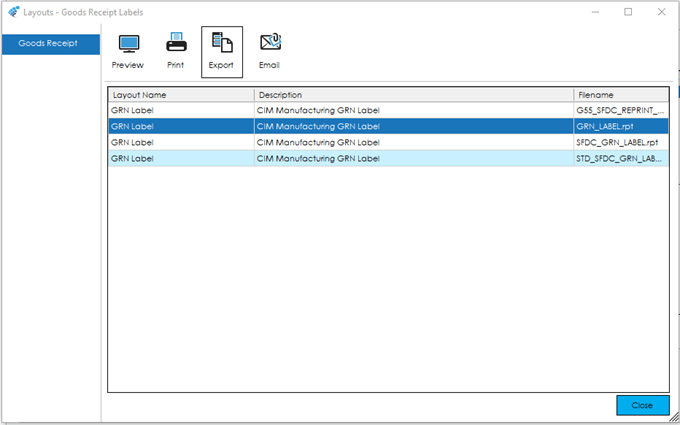
By default, there are two GRN Labels available, a Standard Layout and a Shop Floor Data Capture (SFDC) Version that includes Bar Codes.
Note: These Labels can be amended to suit your requirements using a full version of Crystal Reports and additional Labels can be added to the system, as is the case in the above example.
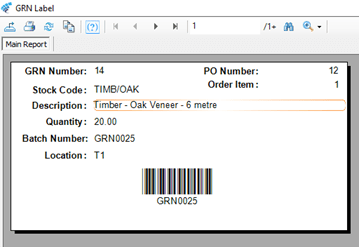
An example GRN Label is below. The number of labels is determined by the setting on the Stock Record, providing one per receipt/batch, or one for each item.
Allocate Stock on Goods Receipt
Once the GRN Label has been printed, if the ‘Allocate Works Order when Receiving Goods’ option is checked (Settings> Stock Control Settings> Stock Settings), the following ‘Works Order – Allocate Stock’ screen will appear.
This screen will list any Stock Items being received that are required by Works Orders, providing the option to allocate stock to these works orders.
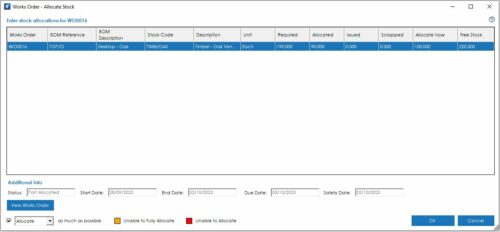
The screen is broken down into two sections with a grid detailing the following:
Works Order: The Works Order where the Stock Item being Received and Allocated is a Component.
Stock Code: The Stock Item being Received & Allocated.
Description: The Description of the Stock Item being Received & Allocated.
Unit: The Unit of Measure of the Stock Item.
Required: The Quantity of the Stock Item required as a component on the Works Order.
Allocated: The Quantity of the Stock Item Allocated to the Works Order already.
Scrapped: The Quantity of the Stock Item scrapped against the Works Order.
Allocate Now: The Quantity of the Stock Item the user would like to allocate during this process.
Free Stock: The current Free Stock of the Stock Item being Received & Allocated.
Note: Further details regarding the function of the fields in this grid will be covered within the Works Order Processing guide.
At the bottom of the screen is the ‘Additional Info’ area, providing further details relating to the Works Order, a button to view the Works Order, and options for how you would like to allocate stock to the Works Order.

The fields within the section are as follows:
Status: The current Status of the Works Order.
Start Date: The scheduled Start Date of the Works Order and when the component stock is required.
End Date: The scheduled End Date of the Works Order and when the Works Order is to be completed and the Stock Item being made on the Works Order is expected into stock.
Due Date: The Due Date the Stock Item being made on the Works Order are required to meet a demand, for Example a Sales Order Due Date, or if this was a sub-assembly the Works Order Start Date for the finished item.
Safety Date: The date the Works Order is due to be completed, less any safety planning period days that are configured in the Planning Settings.
View Works Order: The view works order button opens the highlighted works order, allowing you to view any details related to that works order.
Allocate: In the bottom left there is the following options with a checkbox. If unchecked, the user can enter values into the grid as required. If checked, the dropdown becomes active and allows the following:
Allocate as much as possible: When selected, the grid will be prefilled with a quantity that either matches the required less the Allocated and Issued quantities, or the quantity being received; this would be the lesser of the two.
Unallocate: When selected, the grid will be prefilled with a negative quantity that matches the Allocated quantity.
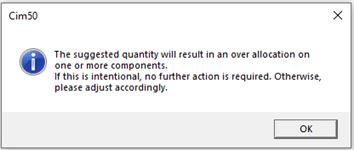
Suggest Qty: When selected, a screen will appear requesting the quantity of the Finished Item being made on the Works Order you would like to allocate stock for.

Once entered and confirmed, the grid will be prefilled with a quantity of the components needed to manufacture the finished item.
If the quantity entered results in an over allocation of Stock, the following message would appear, and you can then take the appropriate action.
Once the quantities have been entered for Traceable Items, the following screen will appear to allow you to review Traceable details and select the Batch or Serial Numbers that are to be allocated.
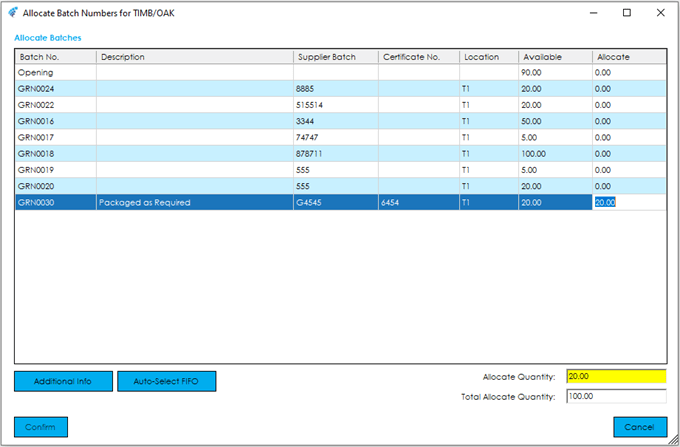
The quantities can either be entered manually to match the Allocate Quantity highlighted in Yellow, or when the Auto-Select FIFO (First In First Out) button is clicked ,the quantities are prefilled, consuming the oldest traceable items (Batch or Serial Numbers) first.

Once the allocated quantities are matched, the Allocate Quantity field will no longer be highlighted, and the Confirm button will become active, allowing the allocation to take place, and returning you to the previous screen.
There is also the option to cancel out of selecting the traceable items and return to the previous screen.

Note: Further details regarding the function of the fields in this section will be covered within the Works Order Processing guide.

Once returned to the ‘Allocate Stock’ screen, the Confirm button will action the Allocations whilst the Cancel button will exit the screen and no allocations will take place.
In both instances you will be returned to the ‘Receive Purchase Order’ screen to select the next Purchase Order or close out of the ‘Receive Purchase Order’ screen.
Needed By
To the right of the Receive button is the ‘Needed By’ feature. When clicked, this allows you to identify if the Stock Item being received is required for a Works Order component, or Sage 50 Accounts Sales Order line, and shows if it has been linked by the Planning Module.
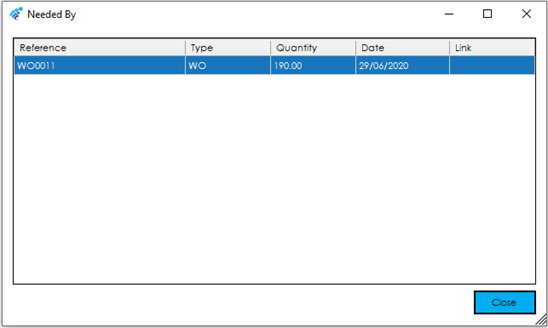
The fields within this grid are described below:
Reference: The Cim50 Works Order Number or the Sage 50 Accounts Sales Order Number requiring the Stock Item being received.
Type: The type of order, WO for Works Order and SO for Sales Order.
Quantity: The quantity required by the Cim50 Works Order Number or the Sage 50 Accounts Sales Order.
Date: The date the component is required by the Cim50 Works Order (Normally the Start Date of the Works Order) or the Due Date of the Sage 50 Accounts Sales Order line.
Link: This denotes if the MRP feature of the Cim50 Planning Module has linked the Stock Item/Purchase Order Line being received to the Cim50 Works Order or Sage 50 Accounts Sales Order. (This will be covered in more detail within Planning and MRP)
Use the Close button to close out of this screen and return to the ‘Receive Purchase Order’ screen.
See also
Related
Other tasks